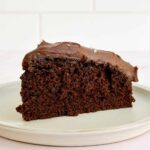

This small red velvet cake is a moist six inch two layer cake with a light chocolate flavor, and a rich cream cheese buttercream. It’s the perfect mini sized cake for birthdays, valentine’s day or when you just need a slice of cake.

In the words of my family… “This small red velvet cake is the best cake you’ve ever made!” This cake is so moist and soft while being both easy and quick to throw together. I am certain you and anyone who tries it will love it just as much as we do.
For more smaller sized cakes you should try my raspberry white chocolate loaf cake, my individual butter cakes or my single layer chocolate cake with chocolate ganache.
Jump to:
Why You Will Love This Recipe
- Smaller Size: I love having a smaller recipe for when we need a cake for our family, but don’t want a lot leftover.
- Moist: The crumb of this cake is so soft and tender.
- Red Color: I love how this cake is instantly perfect to serve for both Valentine’s Day or Christmas with the vibrant red color.

Ingredient Notes
Full ingredient measurements and instructions can be found in the recipe card below.
- Cocoa Powder: I suggest using dutch cocoa powder because it is richer in flavor and also a tad more red in color, but regular unsweetened cocoa powder will work great also.
- Oil: Use a neutral flavored oil such as (melted) coconut, avocado or vegetable.
- Food Coloring: I use McCormick’s liquid red food coloring. The gels will work also, but are stronger in color so you could use less.
- Buttermilk: The higher the fat content on your buttermilk the more moist your cake will be, so I always suggest using a full fat if possible.
- Cream Cheese: Philadelphia is my favorite cream cheese to use for frostings. It has the least amount of liquid and best texture for whipping.
Step by Step Instructions

- Step 1: In a medium mixing bowl, whisk together dry ingredients, flour, cocoa powder, baking soda and salt.

- Step 2: In a medium bowl add oil, eggs, granulated sugar and mix all together 2-3 minutes. Add in vanilla and red food coloring and mix again. In a separate small bowl or measuring cup add the buttermilk and vinegar together.

- Step 3: Add half of the dry ingredients to the batter, followed by the buttermilk/vinegar mixture. And then the rest of the dry ingredients.

- Step 4: Pour batter evenly into two 6-inch cake pans.

- Step 5: Bake for 28-35 minutes, or until a toothpick inserted in the middle of the cakes comes out clean. Transfer the baking pans to a wire cooling rack and let the cakes cool until they reach room temperature.

- Step 6: Cream together butter with softened cream cheese until smooth. Add vanilla and salt and mix again. Add in powdered sugar and beat until smooth. If after adding all the powdered sugar you think its too thick, feel free to add a tablespoon or two of whipping cream or milk to get desired consistency.

- Step 7: Place one of the cake layers, top side up, on a cake plate or serving stand. Spread a small amount of frosting over the first layer. Place the remaining cake layer, top side down. Frost the entire cake, top and sides, with a thin crumb coat layer of the cream cheese frosting. Place in the fridge or freezer for about 10-15 minutes to chill.

- Step 8: Pull the chilled cake out, and frost the cake with the remaining frosting. Cut and enjoy!
Expert Baking Tips
- Cakes will have the best results if made with room temperature ingredients. I like to pull my eggs, buttermilk, cream cheese, and butter out of the fridge an hour or two before I start baking.
- Do not ever refrigerate your cake, this will dry it out. You are welcome to freeze the cake layers or finished cake.
- Make Ahead Instructions: The frosting can easily be made ahead of time and stored in the fridge in a sealed container. Remove frosting from the fridge an hour before you’re ready to frost the cake, to give it time to come to room temperature.
- Freezing Instructions: After baking the cake layers, allow them to cool completely, then wrap them well in plastic wrap and stick each layer in a ziplock freezer bag. They can be frozen for a few months. I usually just pull them out of the freezer once I am starting to make my frosting, or an hour or two before I want to assemble.

FAQ
Yes, you can bake this as a single layer cake as well. It should be about the same amount of time as well.
Yes, add 2 teaspoon of vinegar to your milk, stir and allow to sit for 5 minutes to curdle. It will not be the same as buttermilk, but is a great alternative.
You could use my chocolate buttercream from my small chocolate cake instead.

Storing & Freezing
This small red velvet cake can be stored in an airtight container at room temperature for 3-4 days while remaining fresh. You do not need to store it in the fridge.
You can store the whole cake, or individual slices wrapped tightly, in the freezer for 2-3 months. Just pull out and allow to thaw before eating.
Other Popular Recipes to Try
For more yummy treats follow me on instagram @thesaltedsweets. And be sure to tag me and comment if you make them and love them as much as I do!

Small Red Velvet Cake
This small red velvet cake is a moist six inch two layer cake with a light chocolate flavor, and a rich cream cheese buttercream. It’s the perfect mini sized cake for birthdays, valentine’s day or when you just need a slice of cake.
Prevent your screen from going dark
Instructions
To make the cake:
-
Preheat the oven to 325 degrees. Spray the bottom of 2 six inch round cake pans or 1 eight inch cake pan with cooking spray and line the bottom with parchment paper. Set aside.
-
In a medium mixing bowl, whisk together dry ingredients, flour, cocoa powder, baking soda and salt.
-
In a medium bowl add oil, eggs, granulated sugar and mix all together 2-3 minutes. Add in vanilla and red food coloring and mix again. In a separate small bowl or measuring cup add the buttermilk and vinegar together.
-
Add half of the dry ingredients to the batter, followed by the buttermilk/vinegar mixture. And then the rest of the dry ingredients.
-
Pour batter evenly into two 6-inch cake pans.
-
Bake for 28-35 minutes, or until a toothpick inserted in the middle of the cakes comes out clean. Transfer the baking pans to a wire cooling rack and let the cakes cool until they reach room temperature.
To make the frosting:
-
Cream together butter with softened cream cheese until smooth. Add vanilla and salt and mix again. Add in powdered sugar and beat until smooth. If after adding all the powdered sugar you think its too thick, feel free to add a tablespoon or two of whipping cream or milk to get desired consistency.
To assemble cake:
-
Place one of the cake layers, top side up, on a cake plate or serving stand. Spread a small amount of frosting over the first layer.
-
Place the remaining cake layer, top side down. Frost the entire cake, top and sides, with a thin crumb coat layer of the cream cheese frosting. Place in the fridge or freezer for about 10-15 minutes to chill.
-
Pull the chilled cake out, and frost the cake with the remaining frosting.
Notes
I have given both cups and grams as measurements. Grams will be more precise, especially when measuring flour. If you don’t have a kitchen scale, no problem! Just lightly spoon flour into your measuring cup to insure its not packed in there. Light and fluffy is the key.
Make Ahead Instructions: The frosting can easily be made ahead of time and stored in the fridge in a sealed container. Remove frosting from the fridge an hour before you’re ready to frost the cake, to give it time to come to room temperature.
Freezing Instructions: After baking the cake layers, allow them to cool completely, then wrap them well in plastic wrap and stick each layer in a ziplock freezer bag. They can be frozen for a few months. I usually just pull them out of the freezer once I am starting to make my frosting, or an hour or two before I want to assemble.
Nutrition
Calories: 414kcalCarbohydrates: 55gProtein: 4gFat: 21gSaturated Fat: 7gPolyunsaturated Fat: 4gMonounsaturated Fat: 10gTrans Fat: 0.2gCholesterol: 44mgSodium: 264mgPotassium: 73mgFiber: 1gSugar: 42gVitamin A: 341IUCalcium: 33mgIron: 1mg